


Decentralized Masters Download the Blueprint The complete guide · PDF
DeFi Accelerator 5.0 · Starter Blueprint

The DeFi Landscape, Mapped

A visual map of the tools we use in DeFi - the wallets, the networks, and the apps that run on them, and how they all fit together. Use it as your reference; the hands-on setup lives in the Accelerator lessons on Circle.

Or browse the full ecosystem
Decentralized Masters
5
Clear steps
3
Networks
40+
Vetted protocols
The big picture

How The Pieces Fit Together

From your hardware wallet to your first liquidity pool - here's how each piece connects. Watch the matching lessons in the DeFi Accelerator 5.0 on Circle, where the hands-on setup lives.

See the full map Every network & app on one canvas
  1. {{ s.area }}
Steps 1 & 2

Set up your wallets

Start with a hardware wallet for safety, then add a software wallet for each network you use.

1
Step One
Hardware

Hardware wallet

Keeps your long-term holdings offline. The single most important step.

OR
+
2
Step Two
Software

Software wallets

One per network. Use these for daily activity. Pair them with your Ledger/Trezor for secure access.

{{ p.network }}
OR
Steps 3 & 4

Choose a network & put it to work

Each network has its own apps. Pick one to start, then swap, provide liquidity, lend, borrow, or trade with protocols we trust.

{{ w.tag }}

{{ w.name }}

{{ w.tagline }}

{{ c.label }}

{{ c.blurb }}

5
Step Five

Bridges

A bridge moves your money from one network to another. Use them carefully - always send a small test amount first.

Here's what bridging looks like: moving ETH from Rabby to Solflare or Nu.fi on Solana using deBridge.

{{ f.label }}
{{ f.emoji }}
OR
{{ f.big }}
{{ f.sub }}

Ethereum ↔ Solana & more

To Sui

Wallets · Ecosystem · Bridges, on one page

All Five Steps, One Flow

Pick your network in Step 3 and Steps 2, 4 and 5 update to match - your wallet, your apps, and your bridges, all without leaving the page.

1
The foundation · every network

Set up a hardware wallet

Do this once. A Ledger or Trezor stores your keys offline and protects everything you do on every network below.

OR
2
One per network · tap to select yours

Add a software wallet

OR
3
Choose once · everything follows

Choose your network

4
Put it to work · {{ net.shortName }}

Swap, lend & trade

{{ c.label }}

{{ c.blurb }}

5
Move between chains · into {{ net.shortName }}

Bridge between networks

Reference · wallets, networks, apps & bridges

How It All Connects

New to DeFi and not sure where to begin? This is the orientation map. Start by comparing the three networks, then see the full setup for the one you pick - hardware wallet, software wallet, apps, and bridges, in the order they fit together.

HARDWARE
Your hardware wallet · works on every network
OR
WALLET
Your software Web3 wallet · one per network
OR
NETWORK
Compare and pick one · start on Ethereum
APPS
Put {{ net.shortName }} to work · swap, lend & trade

{{ c.label }}

{{ c.blurb }}

BRIDGES
Bridge between networks · move money between Ethereum, Solana & Sui

How bridging works: moving ETH from Rabby to Solflare or Nu.fi on Solana using deBridge.

{{ f.label }}
{{ f.emoji }}
OR
{{ f.big }}
{{ f.sub }}
Explore & discover

What do you want to do in DeFi?

Pick a goal below and we'll hand you the exact apps that do it - plus the wallet and network you need to get there. No jargon, no guesswork. Just tap and explore.

{{ findGoalActive.heading }}

To do this, here's the path you need
{{ s.kicker }}
{{ s.label }}
{{ s.sub }}

Read it right to left: the app is your goal - everything to its left is what you set up first to get there.

On Solana  Ledger users pick Solflare, Trezor users pick Nu.fi.

Bonus

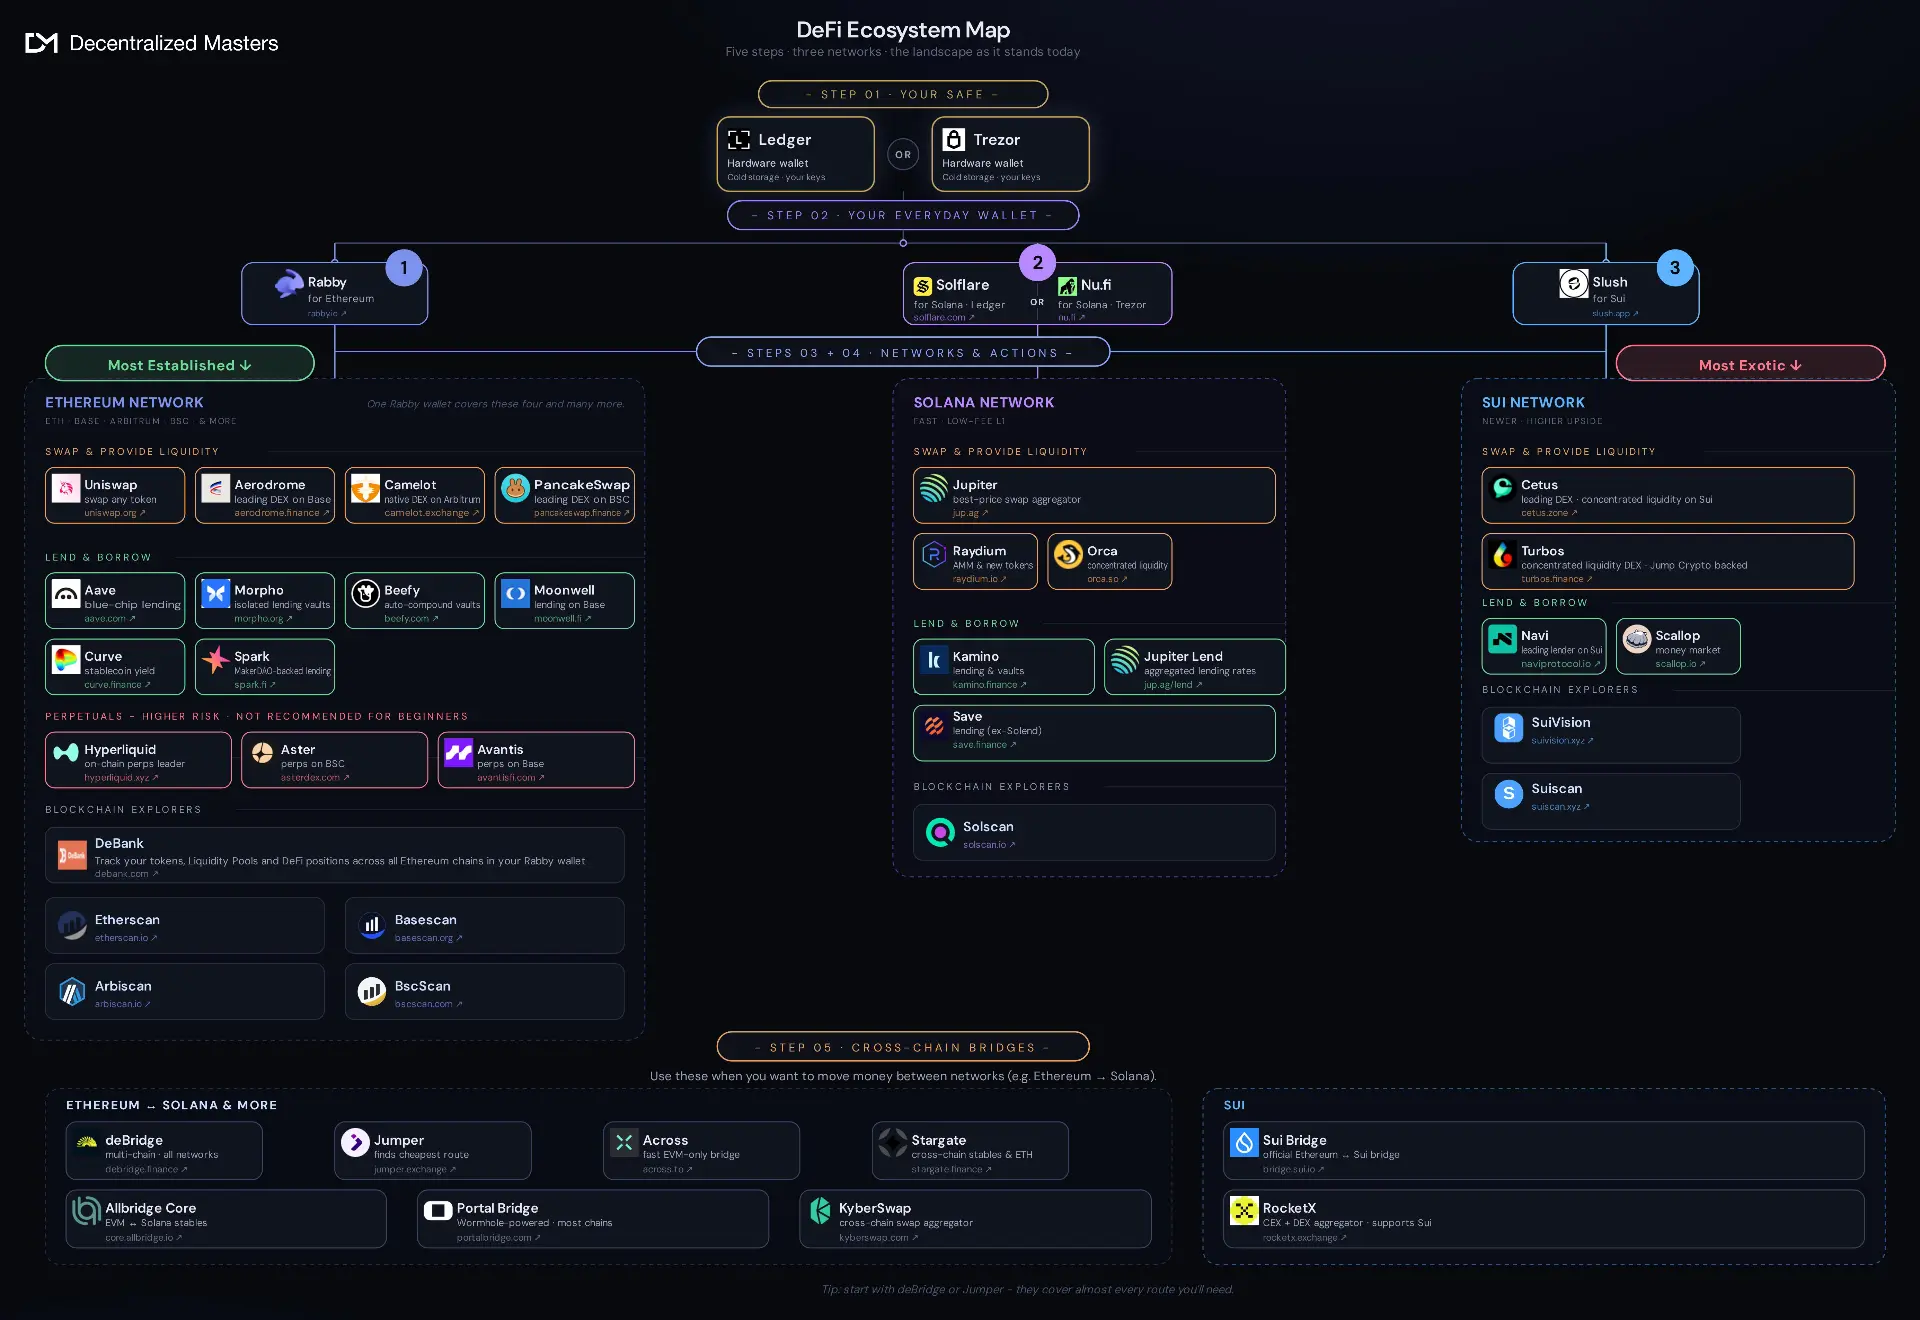
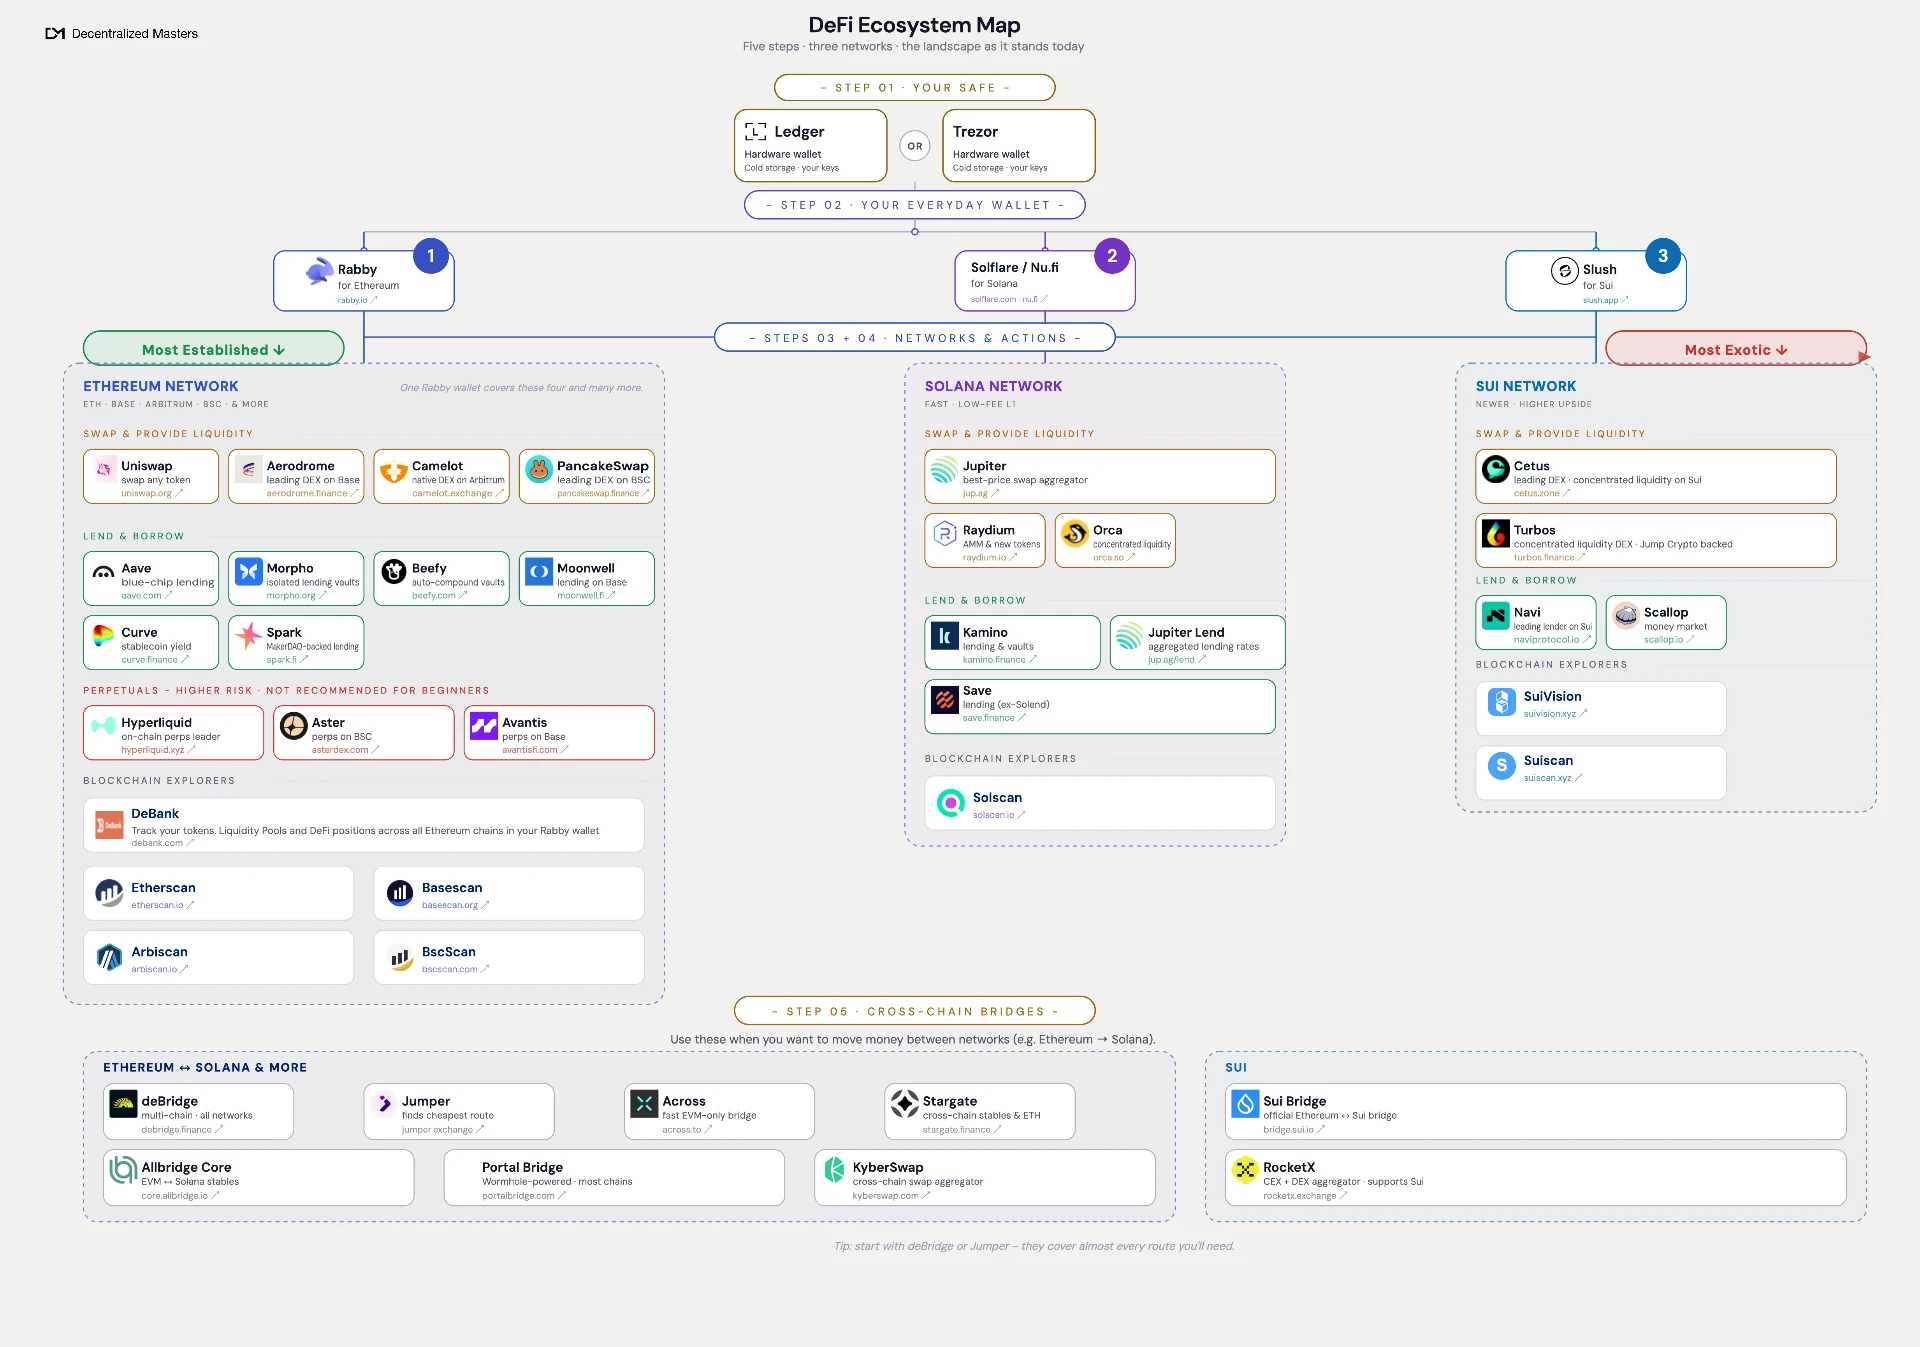
Full visual map

The bird's-eye view of every network, wallet, and protocol - all on one canvas. Tap any name for details.

How to read this map
Ethereum Solana Sui Hardware

Read top to bottom: your hardware wallet, then a network wallet, then the apps on each network, and finally the bridges between them. Tap any tile to see what it is and its link.

Seen the map?

Start with the pieces

Explore the pieces in order - hardware wallet, software wallet, network, apps, and bridges - and how they fit together.

Want this on your wall? Grab the print-quality version of the map: Dark version (PNG) Light version (PNG)
Your First Liquidity Pool

From your bank account to your first DeFi pool

{{ f.label }}
{{ f.emoji }}
{{ f.big }}
{{ f.sub }}
  1. {{ s.emoji }}
    Step {{ s.n }}

    {{ s.title }}

    {{ s.like }}

    ▸ You do
    • {{ d.i }} {{ d.text }}
    {{ s.result }}
You're ready

Launch your first liquidity pool

The Accelerator walks you through depositing on Morpho first - start there, then explore Beefy and Uniswap once you're comfortable.

Where to put your USDC/ETH to work

Follow the order - start with 1.

No Investment Advice: Decentralized Masters content is provided for informational purposes only and does not constitute legal, tax, investment, financial, or other professional advice.

{{ modal.name }}

{{ modal.note }}

{{ modal.description }}

What you need to use it
Network
{{ modal.need.netName }}
Wallet
{{ modal.need.walletNameA }}
{{ modal.need.walletNoteA }}
OR
{{ modal.need.walletNameB }}
{{ modal.need.walletNoteB }}
Wallet
{{ modal.need.walletName }}
What you need to bridge
1
The asset you're moving, sitting in your wallet on the network you're leaving (the "from" side)
2
A wallet ready on the destination network, to receive the funds (the "to" side)
3
A little gas on the network you're leaving to pay the transaction fee (you pay on the "from" side; the receiving side doesn't pay)
Always send a small test amount first before moving the full sum.
Visit {{ modal.name }}
Similar apps, same wallet & network — tap to compare

By clicking this link you will leave the Decentralized Masters site and be directed to a third-party website.

{{ intro.title }}

{{ intro.lead }} {{ intro.highlight }} {{ intro.tail }}